Installing and configuring MySQL Community Server
Google Cloud SQL is a fork of MySQL. You'll need MySQL Community Server on your development machine in order to use Google Cloud SQL. You develop and test your programs locally, then upload them to App Engine.
This is a long section, broken up into bite-size pieces. If you already have MySQL up and running and know how to perform common admin tasks, you can skip it. If you don't, it is a gentle introduction that explains many of the most common tasks you'll perform, why you'll perform them, and what they mean.
It's worth nothing that the MySQL documentation is clear, easy to follow, and is some of best documentation for any piece of software.
The one advantage this section has is that it focuses on the minimum you need to get up and running so that you can get going with Google Cloud SQL for your project. The MySQL docs are necessarily enormous and are meant to be comprehensive.
This chapter shows how to:
- Install and configure MySQL to run locally on your own machine
- Start the MySQL service
- Put the MySQL command-line utilities on the PATH
- Start the MySQL client for the first time
- Configuring MySQL with the mysql client
Database administration requires knowing a bunch of stuff. It's easy for things to go wrong and it can be hard to diagnose what happened when you don't know that stuff. This chapter tries to anticipate the most common causes of error and let you know ways to solve them, while explaining the reasons for each case.
Downloading and installing MySQL Community Server
Although MySQL is a free download, the project's parent company, Oracle, wants you to run through a few hoops to get it. They ask you to create an account, then fork over some personal information. This is unusual in a world of painless, instant downloads from GitHub but Oracle is well within the rights granted by its GPL license to do so.
To Oracle's credit, if you read the fine print you can skip these steps. Here's how.
Visit the MySQL Community Downloads page and choose MySQL Community Server (GPL).
You're asked to select a platform, but it probably sniffs your browser's operating system setting and chooses the right default.
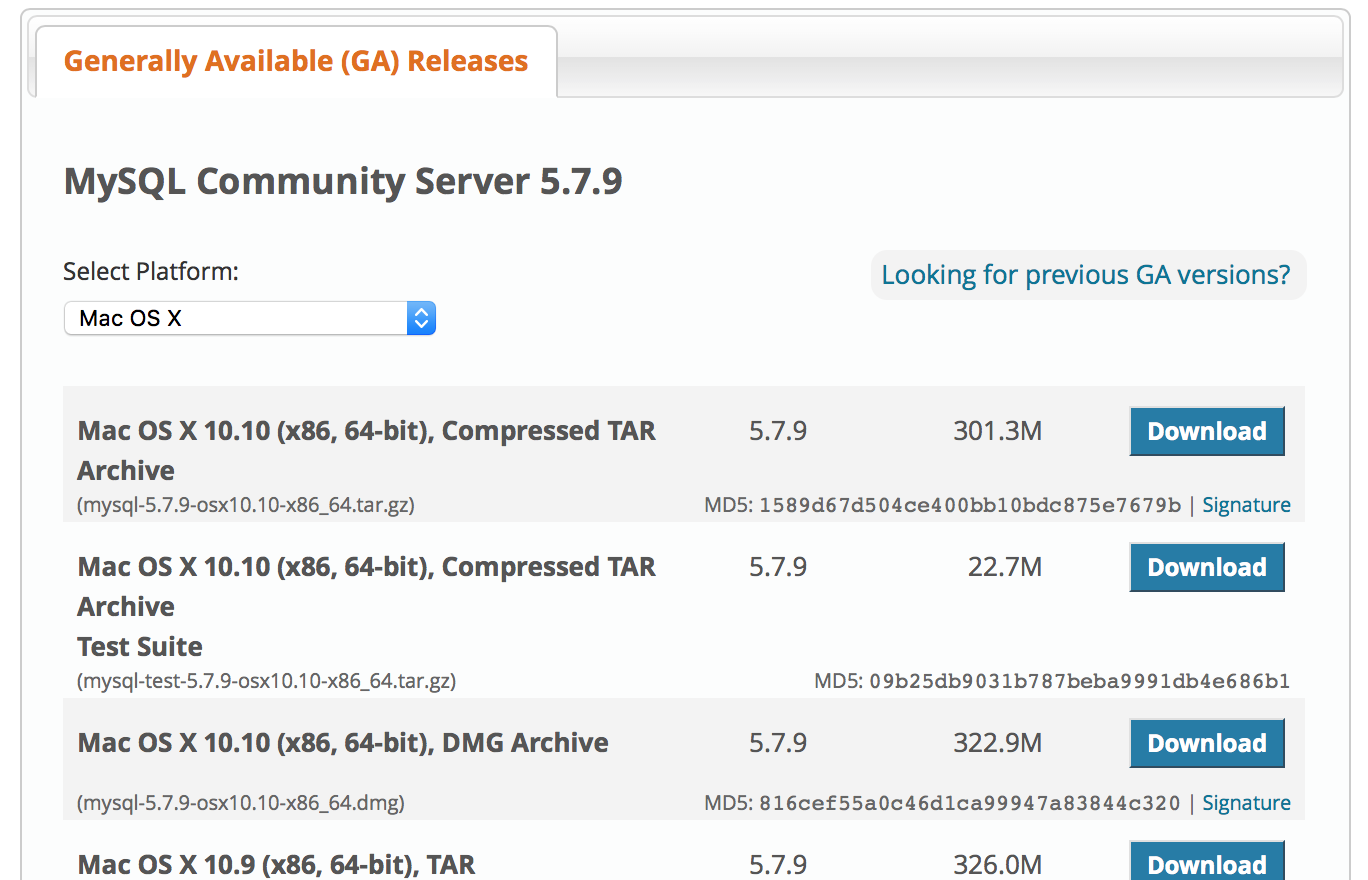
A page appears looking something like this:
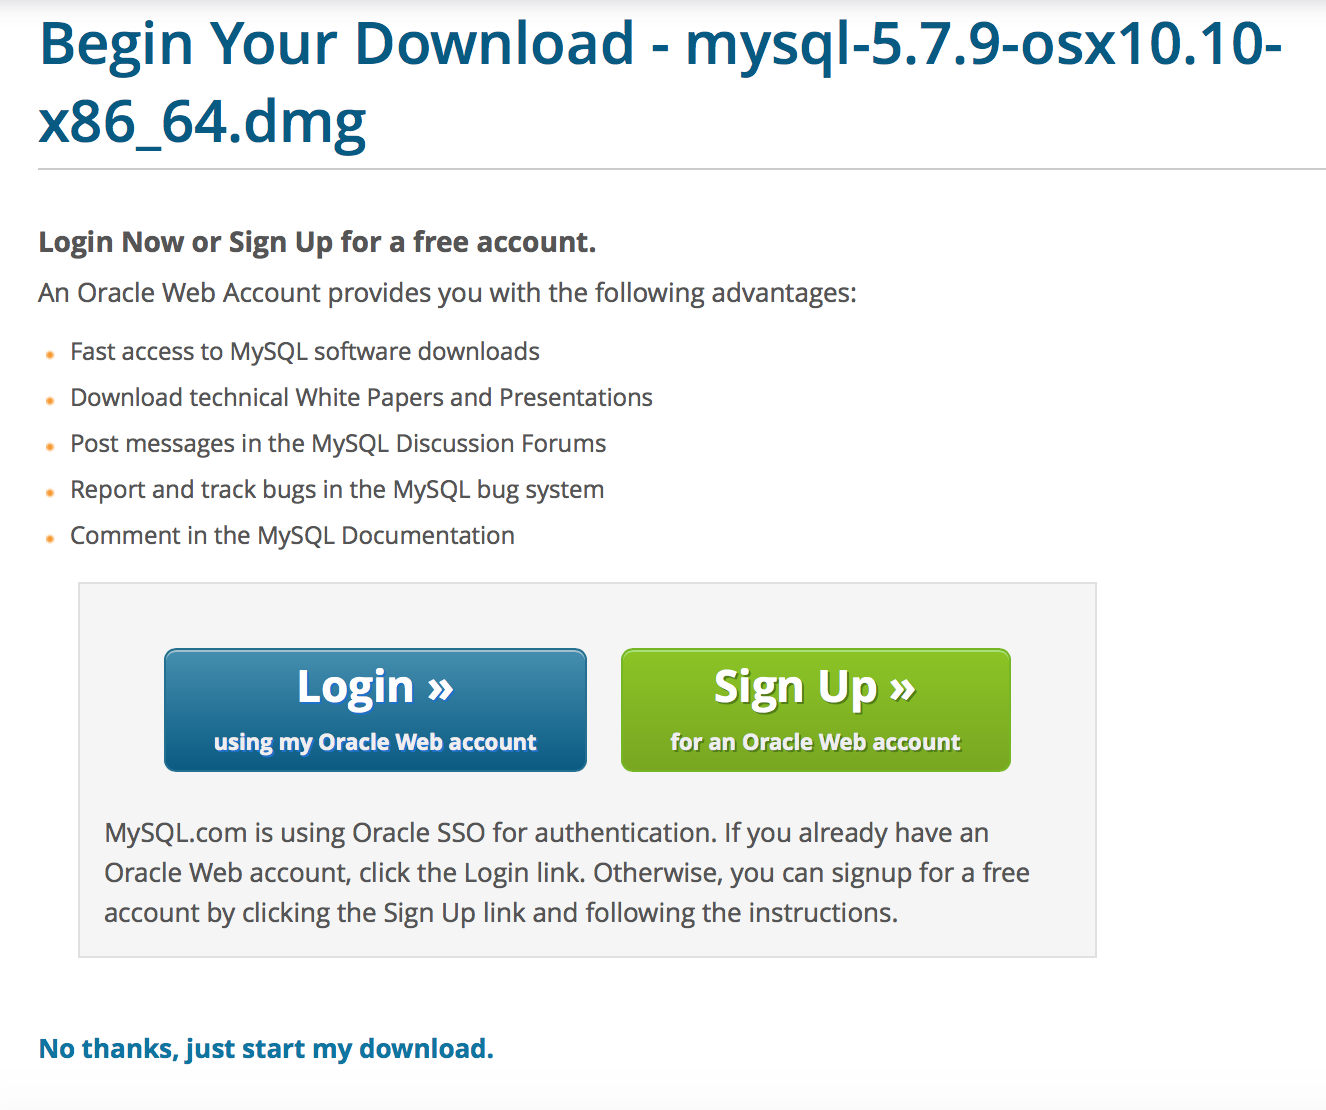
- Click the No thanks, just start my download link.
- Locate the file using your browser's Downloads view. Double-click to install it and accept all defaults.
You are presented with your temporary password during installation.
Copy and paste that temporary password!
It would be a drag to forget it, so take extraordinary measures to preserve it right now.
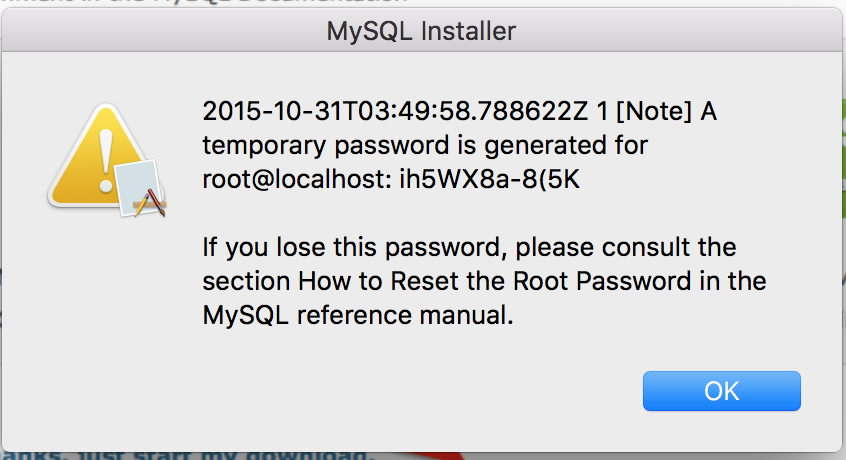
- Copy it immediately using your system's clipboard and paste it into a text file immediately, or:
- Take a screen shot so you have a permanent record.
If you don't take this advice, terrible things will happen to you and all your sysadmin friends will laugh scornfully every time to you walk into a room. Your database administrator card will be revoked. If you're single, you will have trouble getting a date. All because you didn't save your password.
Restart your session
On some systems, you don't yet have a running server. MySQL will run every time you restart your computer from here on out.
You must reload the shell at this point. You can either log out of your current computer session, then log back in or do this from the command line:
$ exec -l $SHELL
Starting the MySQL service
MacOS version
- To start MySQL manually on MacOS, choose the apple menu, then System Preferences.., and finally MySQL:
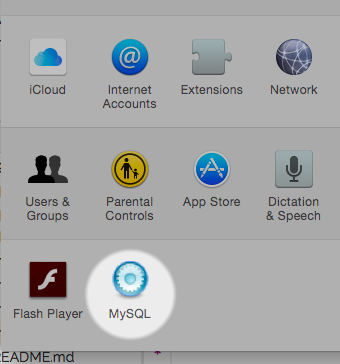
- From the MySQL pane, click Start MySQL Server.
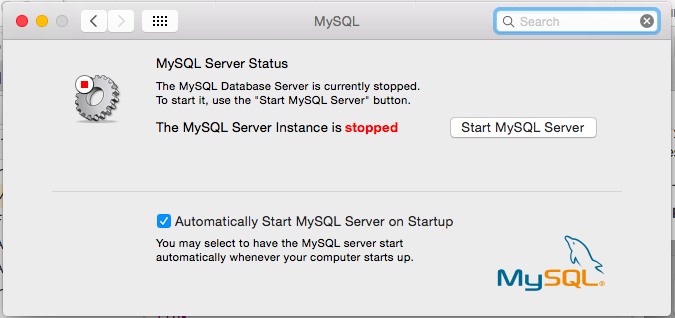
In a moment, the pane shows graphically that MySQL service has started, probably something along line the lines of a green light icon appearing, or a red icon changing to green.
Putting MySQL command-line utilities on the PATH
You're ready to use MySQL as a server, but on OS X and Linux systems some command-line utilities may not yet be easily available. They're important. You need to find their location and update the system's PATH variable.
As you can see from the illustration from here on out MySQL will start automatically when you log in or turn on your machine.
Determining if MySQLD and MySQL are on the path: OS X and Linux versions
The MySQL daemon (or service, in Windows parlance) that runs in the background is only one of the many executables that come with MySQL. Its name is mysqld.
- Open your system's terminal so you can use its command line.
- Enter the following (OS X/Linux version):
$ which mysqld
/usr/local/mysql/bin/mysqld
If it doesn't seem to be available (silent output on OS X and Linux, or something like File not found on Windows), you must find the MySQL directory for executables and add it to the path.
Finding the MySQL bin directory: OS X/Linux
You only need to do this if you couldn't find the location of the mysql binaries in the previous step.
The mysqld daemon is running in the background if you followed the previous directions, so find it:
# Get a list of running services.
# Pipe its output to the text-search utility grep.
# Show only lines containing the text 'mysqll.
$ ps aux | grep mysql
Here's what you just did.
- The
pscommand displays a list of running processes. Theauxoption, to simplify a little, ensures that services are listed (thexpart), that they are listed for all users and not just the current users (theapart), and that detailed information will be displayed (theupart). - The pipe symbol (
\) causes output to be sent not to the screen but to... - the
grepcommand, which performs a search through that output. It searches for the stringmysql, which will includemysqld.
The output should look roughly like this:
_mysql 950 0.0 5.4 3085700 450332 ?? Ss 2:02AM 0:00.49 /usr/local/mysql/bin/mysqld --user=_mysql --basedir=/usr/local/mysql --datadir=/usr/local/mysql/data --plugin-dir=/usr/local/mysql/lib/plugin --log-error=/usr/local/mysql/data/mysqld.local.err --pid-file=/usr/local/mysql/data/mysqld.local.pid --port=3307
You'll find the CLI utilties such as mysql wherever the mysqld binary is, and the path containing /bin is the giveaway. Let's check out the contents of that directory:
$ ls /usr/local/mysql/bin/
You should see a lot of files listed. Here's a sampling of what you should expect:
innochecksum       mysqlaccess
msql2mysql         mysqlaccess.conf
my_print_defaults  mysqladmin
myisam_ftdump      mysqlbinlog
myisamchk          mysqlbug
myisamlog          mysqlcheck
... and many more!
Putting the MySQL /bin directory on the path: OS X and Linux version
If you didn't find MySQL or MySQLD on the path, here's what to do
Adding the MySQL bin directory to the path
Add this directory to the path. On OS X, you'd do it like this.
- In this example, the MySQL directory for binaries turned out to be
/usr/local/mysql/bin/, so update your Bash profile like this:
# Appends the mysql executable path to
# the existing path.
$ echo PATH=$PATH:/usr/local/mysql/bin/ >> ~/.bash_profile
Restart the operating system shell
The new path won't take effect until you restart your terminal, so restart your operating system shell:
# In OSX or Linux, this restarts the
# shell without having to shut down
# the terminal session
$ exec -l $SHELL
Ensuring MySQL is on the path
- Run the environment variables through grep to ensure the PATH has been updated properly:
# Display any environment variables
# containing the the text "mysql".
$ env | grep mysql
You should see something like this.
PATH=/usr/local/bin:/usr/bin:/bin:/usr/sbin:/sbin:/usr/local/go/bin:/usr/local/mysql/bin/
Here's what you just did.
- The
envcommand displays the contents of all environment variables. - The pipe symbol (
\) causes the output ofenvto be sent not to the screen but to... - the
grepcommand, which performs a search through that output. It searches for the stringmysql, which will includemysqld.
Starting the MySQL client for the first time
You are now ready to start the MySQL client from the command line. Because this is the first time, you have some housekeeping to do. You will only have to perform these tasks once.
- Change the password for user root, if necessary
- Create a new user specifically for database administration
- Start MySQL to make sure it works
- Create a database
# -u root  means to log in with the
# user named root (MySQL's default user name)
# -p means ask for a password.
# (Have the temporary password generated
# by MySQL ready here)
$ mysql -u root -p
As you've probably guessed, -u is followed by optional white space, then the name of the user. And -p means prompt for a password. (You could actually include the password on the command line, but that's not good security practice, because you might be tempted to put it into a shell script.)
- You'll probably be asked for your system login password. Enter it when asked.
You're given some information:
Welcome to the MySQL monitor.  Commands end with ; or \g.
Your MySQL connection id is 11
Server version: 8.0.11 MySQL Community Server - GPL

Copyright (c) 2000, 2018, Oracle and/or its affiliates. All rights reserved.

Oracle is a registered trademark of Oracle Corporation and/or its
affiliates. Other names may be trademarks of their respective
owners.

Type 'help;' or '\h' for help. Type '\c' to clear the current input statement.
mysql>
Your version information will differ but as long as you see the Server version: and mysql> portions you're all right.
Quitting the MySQL client
The first thing you need to know is how to quit the client.
- Type one of the following, then press Enter:
mysql> QUIT
- Or:
mysql> \q
The two are equivalent. As you can see, some commands have shortcuts.
By convention keywords in SQL queries use ALL CAPS but in practice MySQL normally doesn't require them. The all caps convention is followed here because it lets you learn visually what represents a keyword and what represents an identifier.
Database table and field names are usually case sensitive.
Getting help
- Start the MySQL client again and enter
HELPat the prompt:
mysql> HELP
- Or:
mysql> \h
You'll get a massive list of help options. This is just the first level of a tree containing hundreds of help pages. You can dig deeper. Try these examples and see what output you get. Start with HELP SHOW because there are scores of things you can learn about your database world:
mysql> HELP SHOW;
And many, many help topics appear:
Name: 'SHOW'
Description:
SHOW has many forms that provide information about databases, tables,
columns, or status information about the server. This section describes
those following:

SHOW AUTHORS
SHOW {BINARY | MASTER} LOGS
SHOW BINLOG EVENTS [IN 'log_name'] [FROM pos] [LIMIT [offset,] row_count]
SHOW CHARACTER SET [like_or_where]
SHOW COLLATION [like_or_where]
SHOW [FULL] COLUMNS FROM tbl_name [FROM db_name] [like_or_where]
SHOW CONTRIBUTORS
SHOW CREATE DATABASE db_name
SHOW CREATE EVENT event_name
SHOW CREATE FUNCTION func_name
SHOW CREATE PROCEDURE proc_name
SHOW CREATE TABLE tbl_name
SHOW CREATE TRIGGER trigger_name
SHOW CREATE VIEW view_name
SHOW DATABASES [like_or_where]
SHOW ENGINE engine_name {STATUS | MUTEX}
SHOW [STORAGE] ENGINES
SHOW ERRORS [LIMIT [offset,] row_count]
SHOW EVENTS
SHOW FUNCTION CODE func_name
SHOW FUNCTION STATUS [like_or_where]
SHOW GRANTS FOR user
SHOW INDEX FROM tbl_name [FROM db_name]
SHOW MASTER STATUS
SHOW OPEN TABLES [FROM db_name] [like_or_where]
SHOW PLUGINS
SHOW PROCEDURE CODE proc_name
SHOW PROCEDURE STATUS [like_or_where]
SHOW PRIVILEGES
SHOW [FULL] PROCESSLIST
SHOW PROFILE [types] [FOR QUERY n] [OFFSET n] [LIMIT n]
SHOW PROFILES
SHOW SLAVE HOSTS
SHOW SLAVE STATUS
SHOW [GLOBAL | SESSION] STATUS [like_or_where]
SHOW TABLE STATUS [FROM db_name] [like_or_where]
SHOW [FULL] TABLES [FROM db_name] [like_or_where]
SHOW TRIGGERS [FROM db_name] [like_or_where]
SHOW [GLOBAL | SESSION] VARIABLES [like_or_where]
SHOW WARNINGS [LIMIT [offset,] row_count]

like_or_where:
    LIKE 'pattern'
  | WHERE expr

If the syntax for a given SHOW statement includes a LIKE 'pattern'
part, 'pattern' is a string that can contain the SQL "%" and "_"
wildcard characters. The pattern is useful for restricting statement
output to matching values.

Several SHOW statements also accept a WHERE clause that provides more
flexibility in specifying which rows to display. See
http://dev.mysql.com/doc/refman/5.6/en/extended-show.html.

URL: http://dev.mysql.com/doc/refman/5.6/en/show.html
You see there are dozens of things that could come after show.
- Drill down further with
HELP SHOW DATABASES:
mysql> HELP SHOW DATABASES;

Name: 'SHOW DATABASES'
Description:
Syntax:
SHOW {DATABASES | SCHEMAS}
    [LIKE 'pattern' | WHERE expr]

SHOW DATABASES lists the databases on the MySQL server host. SHOW
SCHEMAS is a synonym for SHOW DATABASES. The LIKE clause, if present,
indicates which database names to match. The WHERE clause can be given
to select rows using more general conditions, as discussed in
http://dev.mysql.com/doc/refman/5.6/en/extended-show.html.

You see only those databases for which you have some kind of privilege,
unless you have the global SHOW DATABASES privilege. You can also get
this list using the mysqlshow command.

If the server was started with the --skip-show-database option, you
cannot use this statement at all unless you have the SHOW DATABASES
privilege.

URL: http://dev.mysql.com/doc/refman/5.6/en/show-databases.html
What happens when you forget a ;
If you've noticed, all the commands we've typed that weren't shortcuts were followed by a semicolon character: ;
The semicolon represents the end of the command, and tells MySQL that the command is ready to be processed. Often you won't need it, but let's see what happens if you omit it in cases where it's required. Type the following without the semicolon and press Enter:
# DO NOT type a semicolon at the end,
# but press Enter after typing this:

mysql> SHOW DATABASES
MySQL is expecting more input, so it redisplays the prompt as shown:
mysql> SHOW DATABASES
    ->
Just add the semicolon and press Enter. You'll get the expected output:
mysql> SHOW DATABASES
    ->;

+--------------------+
| Database           |
+--------------------+
| information_schema |
| mysql              |
| performance_schema |
+--------------------+
3 rows in set (0.01 sec)
Configuring MySQL with the mysql client
Although MySQL is installed, it's not like a word processor or spreadsheet. You need to configure some user and security settings. It can be done interactively but we'll do it using a command line program because at some point you will want to script some of these actions, and because while user interfaces change, MySQL's command line interface has been remarkably stable for the better part of a decade.
The MySQL client also works identically when connecting to another computer over the network or Internet.
The difference between mysqld and mysql
The thing you think of as the MySQL server is a binary named mysqld that runs as a "daemon" (Unix and sometimes OS X terminology) or "service" (Windows and sometimes OS X terminology). It is meant to be started up automatically when the the computer is turned on (or when you session starts), and to run continuously until the computer is turned off, your session is complete, the service is halted.
You interact with mysqld through a command line client named mysql and that's what this section discusses. The mysql client is referred to in many ways, but they all mean the same thing:
The client program named mysql is also known as...
You'll be using the mysql client a lot. It might help you to know that there are a number of ways to refer to this program:
- mysql client
- Client program
- Command line client
- CLI (for Command Line Interface)
- Monitor
- Terminal monitor
Reference
MySQL documentation: Securing the Initial MySQL Accounts
Common errors when using the mysql client
ERROR 1045 (28000): Access denied for user 'something'@'localhost' (using password: NO)
If this error appears, you probably omitted the sudo. Try it again, using sudo mysql -u root.
ERROR 2002 (HY000): Can't connect to local MySQL server
If you try to start mysql and get the message ERROR 2002 (HY000): Can't connect to local MySQL server it probably means you forgot to start the MySQL service.
ERROR 2013 (HY000): Lost connection to MySQL server at 'reading initial communication packet', system error: 0
I have got error ERROR 2013 (HY000) in two cases.
1. Included a password with -p flag
When developing with the mysql client on your own machine it's perfectly acceptable to include a password using the -p flag on the command line.
# -u means username is 'sampleuser'
# -p means use whatever follows as the password
mysql -u sampleuser -p Foobar
If you attempt connecting to a Cloud SQ instance like this, however:
# -u means username is 'sampleuser'
# -h is the IP address of the remote database
# -p means use whatever follows as the password
mysql -u sampleuser -h 2001:4860:4864:1:de34:1928:6ae4:7048 -p Foobar
An error is triggered:
ERROR 1045 (28000): Access denied for user 'sampleuser'@'2601:600:8100:5e8:9cb9:6830:81f1:14c6' (using password: NO)
Cloud SQL doesn't seem to like that, probably because it's not secure (because you could just as easily bake this into a script somewhere, and that's just too easy for bad guys to figure out).
Solution: Retain the -p flag but omit the password, which MySQL will request interactively.
# Use the -p flag but leave off the password.
# MySQL will then ask for it.
mysql -u sampleuser -h 2001:4860:4864:1:de34:1928:6ae4:7058 -p
2. Your IP address isn't known to Google Cloud SQL and has to be added to the Access Control list
Suppose you start the mysql client normally as shown but still get ERROR 2013 (HY000):
# -u means username is 'sampleuser'
# -h is followed by the IP address of the remote database
# -p by itself means ask for the password
$ mysql -u sampleuser -h 173.194.255.122 -p
It may mean you're working from a machine with an address Google Cloud SQL doesn't know about. See Adding your IP address for access control
I have to do this more often than I would like. It seems that some ISPs change your IP address frequently, even during a single session.